
SEQ2SEQ LEARNING Part B: Using the LSTM layer in a Recurrent Neural Network
Welcome to the Part B of the Seq2Seq Learning Tutorial Series. In this tutorial, we will use several Recurrent Neural Network models to solve the sample Seq2Seq problem introduced in Part A.
We will use LSTM as the Recurrent Neural Network layer in Keras.
You can access all my SEQ2SEQ Learning videos on Murat Karakaya Akademi Youtube channel in ENGLISH or in TURKISH
You can access all the tutorials in this series from my blog at www.muratkarakaya.net
If you would like to follow up on Deep Learning tutorials, please subscribe to my YouTube Channel or follow my blog on muratkarakaya.net. Thank you!

Photo by Jess Bailey on Unsplash
REMINDER:
- This is the Part B of the Seq2Seq Learning series.
- Please check out the previous part to refresh the necessary background knowledge in order to follow this part with ease.
A Simple Seq2Seq Problem: The reversed sequence problem
Assume that:
- We are given a parallel data set including X (input) and y (output) such that X[i] and y[i] have some relationship
In that tutorial, I will generate X and y parallel datasets such that the y sequence will be the reverse of the given X sequence. For example,
- Given sequence X[i] length of 4:
X[i]=[3, 2, 9, 1]
- Output sequence (y[i]) is the reversed input sequence (X[i])
y[i]=[1, 9, 2, 3]
I will call this parallel dataset: “the reversed sequence problem”
In real life (like Machine Language Translation, Image Captioning, etc.), we are given (or build) a parallel dataset: X sequences and corresponding y sequences
- However, to set up an easily traceable example, I opt out to set y sequences as the reversed X sequences
- However, you can create X and y parallel datasets as you wish: sorted, reverse sorted, odd or even numbers selected, etc.
- We use the parallel data set to train a seq2seq model which would learn
- how to convert/transform an input sequence from X to an output sequence in y
IMPORTANT:
- In the reversed sequence problem, the input & output sequence lengths are fixed and the same.
- In PART E, we will change the problem and the solution such that we will be dealing with variable-length sequences after we built the encoder-decoder model.
Configure the problem
- Number of Input Timesteps: how many tokens / distinct events /numbers/word etc in the input sequence
- Number of Features: how many features/dimensions are used to represent one token / distinct events/numbers/word etc
- Here, we use one-hot encoding to represent the integers.
- The length of the one-hot coding vector is the Number of Features
- Thus, the greatest integer will be the Number of Features-1
- When the Number of Features=10 the greatest integer will be 9 and will be represented as [0 0 0 0 0 0 0 0 0 1]

Sample X and y

In raw format:
X=[6, 2, 4, 5], y=[5, 4, 2, 6]

In one_hot_encoded format:
X=[[0 0 0 0 0 0 1 0 0 0]
 [0 0 1 0 0 0 0 0 0 0]
 [0 0 0 0 1 0 0 0 0 0]
 [0 0 0 0 0 1 0 0 0 0]]
y=[[0 0 0 0 0 1 0 0 0 0]
 [0 0 0 0 1 0 0 0 0 0]
 [0 0 1 0 0 0 0 0 0 0]
 [0 0 0 0 0 0 1 0 0 0]]

Generated sequence datasets as follows
X_train.shape:  (2000, 4, 10) y_train.shape:  (2000, 4, 10)
X_test.shape:  (200, 4, 10) y_test.shape:  (200, 4, 10)
time: 75.8 ms
Before starting, you need to know:
- Python
- Keras/TF
- Deep Neural Networks
- Recurrent Neural Network concepts
- LSTM parameters and outputs
- Keras Functional API
If you would like to refresh your knowledge about the above topics please check Murat Karakaya Akademi resources on YouTube / muratkarakaya.net.
PART B: Using the LSTM layer in a Recurrent Neural Network
In Part A, we observed that Multi-Layer Perceptron (MLP) does not perform well. Actually, MLP is not able to learn Seq2Seq Learning. The main reason is that MLP pays attention to all its inputs equally and is not aware of the time dimensionality of the input-output relation. Thus, MLP can not relate input with output understanding the sequence order (time dimension)
Therefore, in this part, we will create several models using Recurrent Neural Networks (RNNs). In Keras, we have 3 kinds of implementation of RNNs. I opt-out using LSTM.
Quick LSTM reminder:
LSTM has 3 important parameters (for the time being!)
- units: Positive integer, the dimensionality of the output space
- return_sequences: Boolean, whether to return the last output. In the output sequence, or the full sequence. Default: False.
- return_state: Boolean, whether to return the last state in addition to the output. Default: False.
The first parameter (units) indicates the dimension of the output vector/matrix.
The last 2 parameters (return_sequences and return_state) determine what the LSTM layer outputs. LSTM can return 4 different sets of results/states according to the given parameters:
- Default: Last Hidden State (Hidden State of the last time step)
- return_sequences=True : All Hidden States (Hidden State of ALL the time steps)
- return_state=True : Last Hidden State+ Last Hidden State (again!) + Last Cell State (Cell State of the last time step)
- return_sequences=True + return_state=True: All Hidden States (Hidden State of ALL the time steps) + Last Hidden State (again!) + Last Cell State (Cell State of the last time step)
Using these 4 different results/states we can stack LSTM layers in various ways
IMPORTANT: If you are not familiar with LSTM, you would like to consider refreshing your knowledge by watching/reading the below resources:
Videos:
Notebooks:
- LSTM: From A Programmer’s Perspective
- LSTM: Understanding Output Types
- LSTM: Understanding Number of Parameters
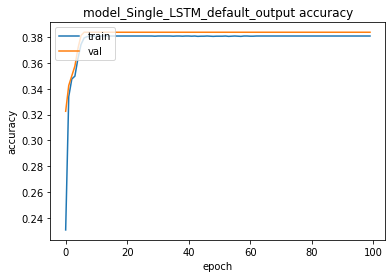
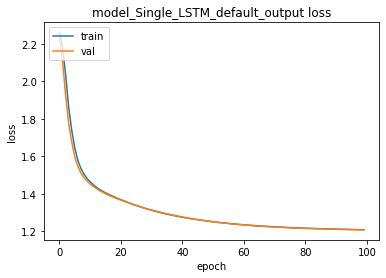
1. LSTM with default output:
- Last Hidden State (Hidden State of the last time step)
- The size of the output vector will be as numberOfUnits (16)
Let’s begin with a model using Single LSTM Layer
I will use Keras Sequential API for the sake of simplicity. However, in the next part of the tutorial, I will be using Keras Functional API
In the model, I use the RepeatVector layer. This layer simply repeats the input n times. Here I make a copy of LSTM output as the number of n_timesteps so that the Dense layer can have an output shape of (batch_size, 4, 10)!
IMPORTANT: You can access and run the full code on Colab.
numberOfUnits=16model_Single_LSTM_default_output = Sequential(name='model_Single_LSTM_default_output')
model_Single_LSTM_default_output.add(Input(shape=(n_timesteps, n_features)))

# Single LSTM Layer with default output
model_Single_LSTM_default_output.add(LSTM(numberOfUnits))
# Repeat the output of LSTM n_timesteps (4 in our example)
model_Single_LSTM_default_output.add(RepeatVector(n_timesteps))
# Dense layer recieves 4 x LSTM outputs as input vector
model_Single_LSTM_default_output.add(Dense(n_features, activation='softmax'))


model_Single_LSTM_default_output.compile(loss='categorical_crossentropy', optimizer='adam',
              metrics=['accuracy'])
model_Single_LSTM_default_output.summary()Model: "model_Single_LSTM_default_output"
_________________________________________________________________
Layer (type)                 Output Shape              Param #
=================================================================
lstm_1 (LSTM)                (None, 16)                1728
_________________________________________________________________
repeat_vector_1 (RepeatVecto (None, 4, 16)             0
_________________________________________________________________
dense_1 (Dense)              (None, 4, 10)             170
=================================================================
Total params: 1,898
Trainable params: 1,898
Non-trainable params: 0
_________________________________________________________________
time: 326 ms
We can run the compiled model using the auxiliary function “train_test()” that I prepared for caring training and testing of a given model with an Early Stopping mechanism.
IMPORTANT: You can access and run the full code on Colab.
train_test(model_Single_LSTM_default_output,
           X_train, y_train , X_test, y_test,
           verbose=0)training for  100  epochs begins with  EarlyStopping(monitor= val_loss   patience= 5 )....
100  epoch training finished...

PREDICTION ACCURACY (%):
Train: 38.113, Test: 38.625
some examples...
Input [2, 6, 6, 8] Expected: [8, 6, 6, 2] Predicted [6, 6, 6, 6]  False
Input [0, 0, 5, 5] Expected: [5, 5, 0, 0] Predicted [5, 5, 5, 5]  False
Input [5, 3, 3, 3] Expected: [3, 3, 3, 5] Predicted [3, 3, 3, 3]  False
Input [4, 3, 4, 2] Expected: [2, 4, 3, 4] Predicted [4, 4, 4, 4]  False
Input [0, 7, 9, 9] Expected: [9, 9, 7, 0] Predicted [9, 9, 9, 9]  False
Input [5, 9, 1, 6] Expected: [6, 1, 9, 5] Predicted [9, 9, 9, 9]  False
Input [1, 9, 1, 3] Expected: [3, 1, 9, 1] Predicted [1, 1, 1, 1]  False
Input [2, 8, 5, 5] Expected: [5, 5, 8, 2] Predicted [5, 5, 5, 5]  False
Input [5, 6, 9, 1] Expected: [1, 9, 6, 5] Predicted [1, 1, 1, 1]  False
Input [5, 9, 0, 5] Expected: [5, 0, 9, 5] Predicted [5, 5, 5, 5]  False
time: 37.1 sObservation: PREDICTION ACCURACY is below 40% for even train data. Thus we need to improve this model by increasing its learning capacity.
Note: In order to increment a model capacity & improve accuracy, in general, we could increment
- number of units
- number of layers
- number of epochs
- number of training samples
We can try all of them on the above model.
For example, we incremented the LSTM unit and noted the result below
PREDICTION ACCURACY AT TEST DATA (%):
- LSTM unit number 16: 38.625
- LSTM unit number 32: 38.625
- LSTM unit number 64: 38.625
However, incrementing the LSTM unit number does not help!
Let’s increment the number of LSTM layers
Let’s continue with a model using Multiple LSTM Layers
- As discussed above, the LSTM layer can return 4 different sets of outputs.
- We will begin with a model containing multiple LSTM layer which is connected to each other by default output (last hidden states)
- That is, the default output (last hidden states) of the first LSTM layer is supplied to the next LSTM layer as inputs!
model_LSTM_default_output = Sequential(name='model_LSTM_default_output')
model_LSTM_default_output.add(Input(shape=(n_timesteps, n_features)))

# First LSTM layer
model_LSTM_default_output.add(LSTM(numberOfUnits))

# Repeat the output of the first LSTM n_timesteps (4 in our example)
model_LSTM_default_output.add(RepeatVector(n_timesteps))

# Second LSTM layer recieves 4 x LSTM outputs as input vector
# Reminder LSTM layer requires 3 dimension input!
# (batch_size, timesteps, features)
# Therefore, we repeated the output of First LSTM layer
model_LSTM_default_output.add(LSTM(numberOfUnits))


model_LSTM_default_output.add(RepeatVector(n_timesteps))

# Repeat the output of Second LSTM n_timesteps (4 in our example)
# Dense layer recieves 4 x LSTM outputs as input vector
model_LSTM_default_output.add(Dense(n_features, activation='softmax'))


model_LSTM_default_output.compile(loss='categorical_crossentropy', optimizer='adam',
              metrics=['accuracy'])
model_LSTM_default_output.summary()Model: "model_LSTM_default_output"
_________________________________________________________________
Layer (type)                 Output Shape              Param #
=================================================================
lstm_11 (LSTM)               (None, 16)                1728
_________________________________________________________________
repeat_vector_6 (RepeatVecto (None, 4, 16)             0
_________________________________________________________________
lstm_12 (LSTM)               (None, 16)                2112
_________________________________________________________________
repeat_vector_7 (RepeatVecto (None, 4, 16)             0
_________________________________________________________________
dense_6 (Dense)              (None, 4, 10)             170
=================================================================
Total params: 4,010
Trainable params: 4,010
Non-trainable params: 0
_________________________________________________________________
time: 599 ms
We can train & test the multi-layer LSTM model using default output now:
train_test(model_LSTM_default_output, X_train, y_train , X_test, y_test, verbose=0)training for  100  epochs begins with  EarlyStopping(monitor= val_loss   patience= 5 )....
100  epoch training finished...

PREDICTION ACCURACY (%):
Train: 38.113, Test: 38.625


some examples...
Input [9, 4, 7, 6] Expected: [6, 7, 4, 9] Predicted [6, 6, 6, 6]  False
Input [8, 2, 8, 6] Expected: [6, 8, 2, 8] Predicted [8, 8, 8, 8]  False
Input [8, 2, 7, 7] Expected: [7, 7, 2, 8] Predicted [7, 7, 7, 7]  False
Input [3, 5, 7, 9] Expected: [9, 7, 5, 3] Predicted [7, 7, 7, 7]  False
Input [8, 7, 2, 6] Expected: [6, 2, 7, 8] Predicted [7, 7, 7, 7]  False
Input [1, 7, 6, 9] Expected: [9, 6, 7, 1] Predicted [7, 7, 7, 7]  False
Input [3, 9, 6, 0] Expected: [0, 6, 9, 3] Predicted [6, 6, 6, 6]  False
Input [5, 8, 3, 8] Expected: [8, 3, 8, 5] Predicted [8, 8, 8, 8]  False
Input [7, 0, 8, 3] Expected: [3, 8, 0, 7] Predicted [0, 0, 0, 0]  False
Input [5, 3, 5, 8] Expected: [8, 5, 3, 5] Predicted [5, 5, 5, 5]  False
time: 43.3 sObservation: PREDICTION ACCURACY AT TEST DATA (%) has not changed at all!
Before trying to increase the capacity of this model, we can use other ways of connecting LSTM layers as follows:
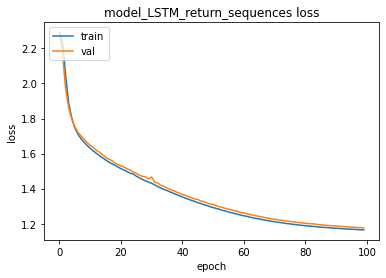
2. A model containing Multiple LSTM Layers by connecting them with return_sequences=True output
- As discussed above, the LSTM layer can return 4 different sets of outputs.
- In the last model, we used the default output to connect 2 LSTM layers
- As a second option, we will create a model containing multiple LSTM layer which is connected to each other by return_sequences=True output (all hidden states at each timestep)
- That is, all hidden states of the first LSTM layer is supplied to the next LSTM layer as inputs!
- Moreover, we also let the second LSTM layer return all hidden states as input to a dense layer
- To connect the last LSTM layer with the dense layer we use the TimeDistributed layer so that for each timestep of the second LSTM’s output, the dense layer will generate one prediction
#@title LSTM with return_sequences=True output

model_LSTM_return_sequences = Sequential(name='model_LSTM_return_sequences')
model_LSTM_return_sequences.add(Input(shape=(n_timesteps, n_features)))

# First LSTM layer with return_sequences=True
model_LSTM_return_sequences.add(LSTM(numberOfUnits,return_sequences=True))

# The output of the First LSTM has the 3 dimensions as expected by
# Second LSTM layer
# Thus, we do not need to use RepeatVector!
model_LSTM_return_sequences.add(LSTM(numberOfUnits,return_sequences=True))

# The output of the Second LSTM has the 3 dimensions
# To supply the output to a dense layer
# we need to use TimeDistributed layer!
model_LSTM_return_sequences.add(TimeDistributed(Dense(n_features, activation='softmax')))
model_LSTM_return_sequences.compile(loss='categorical_crossentropy', optimizer='adam',
              metrics=['accuracy'])
model_LSTM_return_sequences.summary()Model: "model_LSTM_return_sequences"
_________________________________________________________________
Layer (type)                 Output Shape              Param #
=================================================================
lstm_13 (LSTM)               (None, 4, 16)             1728
_________________________________________________________________
lstm_14 (LSTM)               (None, 4, 16)             2112
_________________________________________________________________
time_distributed_3 (TimeDist (None, 4, 10)             170
=================================================================
Total params: 4,010
Trainable params: 4,010
Non-trainable params: 0
_________________________________________________________________
time: 594 ms
We can train & test the multi-layer LSTM model using return_sequences=True now:
train_test(model_LSTM_return_sequences, X_train, y_train , X_test, 	y_test)training for  100  epochs begins with  EarlyStopping(monitor= val_loss   patience= 5 )....
100  epoch training finished...

PREDICTION ACCURACY (%):
Train: 55.488, Test: 55.375

some examples...
Input [9, 9, 3, 7] Expected: [7, 3, 9, 9] Predicted [9, 9, 9, 9]  False
Input [2, 0, 5, 0] Expected: [0, 5, 0, 2] Predicted [6, 0, 0, 2]  False
Input [4, 0, 3, 3] Expected: [3, 3, 0, 4] Predicted [6, 4, 0, 4]  False
Input [4, 8, 3, 2] Expected: [2, 3, 8, 4] Predicted [6, 3, 8, 4]  False
Input [3, 0, 2, 4] Expected: [4, 2, 0, 3] Predicted [3, 0, 0, 3]  False
Input [6, 9, 5, 9] Expected: [9, 5, 9, 6] Predicted [6, 1, 9, 6]  False
Input [2, 4, 1, 6] Expected: [6, 1, 4, 2] Predicted [6, 4, 4, 2]  False
Input [1, 8, 8, 9] Expected: [9, 8, 8, 1] Predicted [5, 1, 8, 1]  False
Input [3, 6, 0, 2] Expected: [2, 0, 6, 3] Predicted [3, 3, 6, 3]  False
Input [5, 5, 2, 7] Expected: [7, 2, 5, 5] Predicted [5, 5, 5, 5]  False
time: 37.1 sObservations:
- PREDICTION ACCURACY AT TEST DATA (%) has improved from 38.625 to 54.875
- This observation indicates that how to connect multiple LSTM layers is important.
- If we compare the latest model with the previous model it is clear that we are exchanging more information between LSTM layers and also with Dense layers.
- Even the parameter numbers are equal!
- In the previous model, we have 16 distinct numbers as the output of the LSTM, on the other hand, in the latest model we have 64 (4*16) distinct numbers.
- Remember in the first model we replicate 16 numbers by 4 times using the RepeatVector layer!
Let’s continue trying other ways of connecting LSTM layers as follows:
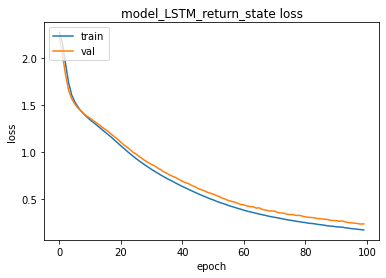
3. A model containing Multiple LSTM Layers by connecting them with return_state=True output
- As discussed above, the LSTM layer can return 4 different sets of outputs.
- As a third option, a model containing multiple LSTM layer which is connected to each other by return_state=True output (last hidden cell states)
- Remember that when return_state=True LSTM layer will return 3 arrays of real numbers:
- LSTM_output (Last Hidden State)
- Last Hidden State (again!)
- Last Cell State (Cell State of the last time step)
- So far we use Keras Sequentia API to create the models.
- But “All layers in a Sequential model should have a single output tensor!”
- For multi-output layers such as the LSTM layer with return_state=True, we need to use the Keras functional API!
- Before continue you would like to refresh your knowledge about the Keras functional API which will help you follow the rest of the tutorial
- Please note that we use the 2nd and 3rd outputs of the First LSTM layer to initialize the next LSTM layer’s state = [Last Hidden State + Last Cell State]. Thus, the Second LSTM layer starts with the last state of the First LSTM layer
- As an input for the next LSTM layer, we can use the 1st output [LSTM_output (Last Hidden State)] but since it is 2D [batchsize, features] and the LSTM layer requires 3D [batchsize, timesteps, features] input, we need to repeat it by timesteps
#@title LSTM with return_state=True output
input= Input(shape=(n_timesteps, n_features))

lstm1 = LSTM(numberOfUnits,return_state=True)
LSTM_output, state_h, state_c = lstm1(input)
states = [state_h, state_c]

repeat=RepeatVector(n_timesteps)
LSTM_output = repeat(LSTM_output)

lstm2 = LSTM(numberOfUnits,return_sequences=True)
all_state_h = lstm2(LSTM_output,initial_state=states)

dense = TimeDistributed(Dense(n_features, activation='softmax'))
output = dense(all_state_h)
model_LSTM_return_state = Model(input,output,name='model_LSTM_return_state')
model_LSTM_return_state.compile(loss='categorical_crossentropy', optimizer='adam',
              metrics=['accuracy'])
model_LSTM_return_state.summary()Model: "model_LSTM_return_state"
__________________________________________________________________________________________________
Layer (type)                    Output Shape         Param #     Connected to
==================================================================================================
input_5 (InputLayer)            [(None, 4, 10)]      0
__________________________________________________________________________________________________
lstm_6 (LSTM)                   [(None, 16), (None,  1728        input_5[0][0]
__________________________________________________________________________________________________
repeat_vector_4 (RepeatVector)  (None, 4, 16)        0           lstm_6[0][0]
__________________________________________________________________________________________________
lstm_7 (LSTM)                   (None, 4, 16)        2112        repeat_vector_4[0][0]
                                                                 lstm_6[0][1]
                                                                 lstm_6[0][2]
__________________________________________________________________________________________________
time_distributed_1 (TimeDistrib (None, 4, 10)        170         lstm_7[0][0]
==================================================================================================
Total params: 4,010
Trainable params: 4,010
Non-trainable params: 0
__________________________________________________________________________________________________
time: 590 ms
We can train & test the multi-layer LSTM model using return_state=True now:
train_test(model_LSTM_return_state, X_train, y_train , X_test, 	y_test)training for  100  epochs begins with  EarlyStopping(monitor= val_loss   patience= 5 )....
100  epoch training finished...

PREDICTION ACCURACY (%):
Train: 95.575, Test: 91.625

some examples...
Input [1, 7, 5, 9] Expected: [9, 5, 7, 1] Predicted [5, 5, 7, 1]  False
Input [8, 9, 7, 3] Expected: [3, 7, 9, 8] Predicted [3, 8, 8, 8]  False
Input [4, 1, 3, 8] Expected: [8, 3, 1, 4] Predicted [8, 3, 1, 4]  True
Input [8, 8, 2, 7] Expected: [7, 2, 8, 8] Predicted [7, 2, 8, 8]  True
Input [2, 2, 2, 2] Expected: [2, 2, 2, 2] Predicted [2, 2, 2, 2]  True
Input [3, 3, 4, 7] Expected: [7, 4, 3, 3] Predicted [4, 7, 3, 3]  False
Input [8, 8, 5, 4] Expected: [4, 5, 8, 8] Predicted [4, 5, 8, 8]  True
Input [2, 7, 1, 5] Expected: [5, 1, 7, 2] Predicted [5, 1, 7, 7]  False
Input [9, 1, 3, 9] Expected: [9, 3, 1, 9] Predicted [9, 3, 1, 9]  True
Input [2, 4, 6, 7] Expected: [7, 6, 4, 2] Predicted [7, 6, 4, 2]  True
time: 38.9 sObservations:
- PREDICTION ACCURACY AT TEST DATA (%) has improved from 38.625 & 54.875 to 91.625
- Again this observation indicates that how to connect multiple LSTM layers is important.
- If we compare the latest model with the previous models it is clear that we are exchanging more information between LSTM layers even though the number of parameters is the same!
- Note that we do not only provide the output of the previous LSTM layer to the next one, but we also provide the last state of the previous LSTM layer to the next LSTM layer as the initial state!
- In the previous models, we have only provided inputs to the next layer, on the other hand, in the latest model we have also provided **initial values for hidden and cell states **of the next LSTM layer as well!
Notice that we still replicate the hidden states 4 times using the RepeatVector layer!
In the next model, we will change what we provide as an input to the next layer
4. A model containing Multiple LSTM Layers by connecting them with return_sequences=True & return_state=True output
- As discussed above, the LSTM layer can return 4 different sets of outputs.
- As the last option, a model containing multiple LSTM layer which is connected to each other by return_sequences=True & return_state=True
- Remember that when return_sequences=True & return_state=True LSTM layer will return 3 arrays of real numbers:
- All Hidden States (Hidden State of ALL the time steps)
- Last Hidden State (Hidden State of the last time step)
- Last Cell State (Cell State of the last time step)
- As an input for the next LSTM layer, we can use the 1st output [All Hidden States] but since it is 3D [batchsize, timesteps, features] we do not need to use RepeatVector as we did above.
- The second and the third outputs will be used as the initial states to the Second LSTM layer.
input= Input(shape=(n_timesteps, n_features))

lstm1 = LSTM(numberOfUnits,return_sequences=True,
             return_state=True)
all_state_h, state_h, state_c = lstm1(input)
states = [state_h, state_c]


lstm2 = LSTM(numberOfUnits,return_sequences=True)
all_state_h = lstm2(all_state_h,initial_state=states)

dense = TimeDistributed(Dense(n_features, activation='softmax'))
output = dense(all_state_h)
model_LSTM_return_sequences_return_state = Model(input,output,
                                name='model_LSTM_all_state_h_return_state')
model_LSTM_return_sequences_return_state.compile(loss='categorical_crossentropy', optimizer='adam',
              metrics=['accuracy'])
model_LSTM_return_sequences_return_state.summary()Model: "model_LSTM_all_state_h_return_state"
__________________________________________________________________________________________________
Layer (type)                    Output Shape         Param #     Connected to
==================================================================================================
input_6 (InputLayer)            [(None, 4, 10)]      0
__________________________________________________________________________________________________
lstm_8 (LSTM)                   [(None, 4, 16), (Non 1728        input_6[0][0]
__________________________________________________________________________________________________
lstm_9 (LSTM)                   (None, 4, 16)        2112        lstm_8[0][0]
                                                                 lstm_8[0][1]
                                                                 lstm_8[0][2]
__________________________________________________________________________________________________
time_distributed_2 (TimeDistrib (None, 4, 10)        170         lstm_9[0][0]
==================================================================================================
Total params: 4,010
Trainable params: 4,010
Non-trainable params: 0
__________________________________________________________________________________________________
time: 566 mstrain_test(model_LSTM_return_sequences_return_state, X_train, y_train , X_test, 	y_test)training for  100  epochs begins with  EarlyStopping(monitor= val_loss   patience= 5 )....
100  epoch training finished...

PREDICTION ACCURACY (%):
Train: 99.537, Test: 99.000


some examples...
Input [2, 1, 7, 4] Expected: [4, 7, 1, 2] Predicted [4, 7, 1, 2]  True
Input [7, 9, 4, 2] Expected: [2, 4, 9, 7] Predicted [2, 4, 9, 7]  True
Input [5, 4, 1, 7] Expected: [7, 1, 4, 5] Predicted [7, 1, 4, 5]  True
Input [7, 2, 8, 5] Expected: [5, 8, 2, 7] Predicted [5, 8, 2, 7]  True
Input [9, 2, 9, 0] Expected: [0, 9, 2, 9] Predicted [0, 9, 2, 9]  True
Input [4, 8, 1, 6] Expected: [6, 1, 8, 4] Predicted [6, 1, 8, 4]  True
Input [6, 6, 3, 5] Expected: [5, 3, 6, 6] Predicted [5, 3, 6, 6]  True
Input [4, 4, 2, 8] Expected: [8, 2, 4, 4] Predicted [8, 2, 4, 4]  True
Input [7, 7, 0, 9] Expected: [9, 0, 7, 7] Predicted [9, 0, 7, 7]  True
Input [7, 7, 9, 4] Expected: [4, 9, 7, 7] Predicted [4, 9, 7, 7]  True
time: 36.5 sNOTES:
- PREDICTION ACCURACY AT TEST DATA (%) has improved from 38.625, 54.875, 91.625 to 97.250
- Again this observation indicates that how to connect multiple LSTM layers is important.
- If we compare the latest model with the previous models it is clear that we are exchanging more information between LSTM layers even though the number of parameters is the same!
In the latest model, we have provided
- previous LSTM’s last hidden and cell states as initial values to the next LSTM layer’s hidden and cell states
- previous LSTM’s all hidden states as inputs to the next LSTM layer
In other words, Second LSTM layer:
- starts to operate with the last hidden states and cell states of the First LSTM layer
- consumes the First LSTM layer’s all hidden states to produce the output
As a result, during training,
- The second LSTM layer is conditioned to produce expected outputs given the First LSTM layer’s outputs.
- The first LSTM layer is conditioned to produce such outputs that the Second LSTM layer would be successful in prediction.
Thus:
- We can argue that the First LSTM layer encodes the input (X) in a representation that the Second LSTM layer can decode it to produce the expected output (y)
- The encoded representation of the input (X) in the last model is composed of the all hidden states + last hidden + cell states
Observations:
- The last model seems to be successful
- When n_timesteps is 4 Last model is able to achieve 97.3% accuracy
- What if we set n_timesteps to 8?
- What if we set n_timesteps to 16?
PREDICTION ACCURACY AT TEST DATA (%) FOR 4 MODELS (100 Epochs 16 LSTM Cells) WITH INCREASING INPUT TIMESTEPS
Sequence Size=4
- 38.625–54.875–91.625–97.250
Sequence Size=8
- 29.625–34.688–50.375–56.437
Sequence Size=16
- 23.344–23.281–33.344–37.469
All the models degrade their performance when we request them to deal with longer sequences!
How to handle longer sequences?
Generic Solution in ANN: Increment the model capacity!
In order to increment a model capacity & improve accuracy, we could
- increment number of units
- increment number of layers
- increment number of epochs
- increment number of training samples
However, even the length of the input sequence is increased a little bit (e.g. from 4 to 8), the model can not catch up with it to provide similar accuracy applying all the above measures!
For example: when sequence size is 16, doubling the LSTM cell numbers to 32, the last model performance improves only 10% (from 37.469% to 47.219%)
CONCLUSIONS:
- LSTM cells and layers are designed to capture sequential relations
- The best result is achieved with the LSTM layer using return_sequences & return_sate are True
- In general, using LSTM layers in a simple Feed Forward Neural Network model does NOT accomplish a scalable accurate solution
- LSTM layers could NOT handle-remember-relate longer sequences.
Moreover: Input or/and Output sequence length would be NOT fixed!
- If we change the problem such that: output sequence is the inverse of the input sequence and only consists of the first appearance of duplicated numbers!
Ex:
- INPUT: [3,2,3,5,2]
- OUTPUT: [2,5,3]
Notice that:
- output sequences do NOT have a fixed length!
- output sequences DO have a variable length!
NOTE:
- Input sequence length would also be variable
- Both Input and Output sequence length could be variable!
Ex:
- Sentence Translation from language A to B
- Each sentence in language A and B has a varying number of words!
New Questions:
- How can you create a model to handle variable-length input/output?
- How can you train such a model?
A MITIGATING SOLUTION FOR VARIABLE INPUT/OUTPUT
- We can use padding -adding some special symbol (e.g. zero) in front of or at the end of each sequence such that all sequences have an equal length with the maximum sequence length in the dataset
- There are many drawbacks to this solution. Few of them:
- Waste of space and computation power
- In real life, sometimes we do NOT know the maximum sequence length
- In some applications, the input sequence is continuous (e.g. speech recognition). Thus, you can NOT wait until the end of the sequence to process ( ie padding) it!
A BETTER SOLUTION
- We can change the model structure!
- So far, we use a single model for training and inference
- In the next part, we will focus on how to create such a model, namely a basic Encoder-Decoder Model.
SEQ2SEQ LEARNING SERIES:
You can access all SEQ2SEQ Learning videos on Murat Karakaya Akademi Youtube channel in ENGLISH or in TURKISH
You can access all the parts on my blog on muratkarakaya.net
References:
Blogs:
- tf.keras.layers.LSTM official website
- A ten-minute introduction to sequence-to-sequence learning in Keras by Francois Chollet
- How to Develop an Encoder-Decoder Model with Attention in Keras by Jason Brownlee
Presentations:
Videos:
Notebooks: