
Character Level Text Generation with an Encoder-Decoder Model
This tutorial is the sixth part of the “Text Generation in Deep Learning with Tensorflow & Keras” series. In this series, we have been covering all the topics related to Text Generation with sample implementations in Python, Tensorflow & Keras.
After opening the file, we will apply the TensorFlow input pipeline that we have developed in Part B to prepare the training dataset by preprocessing and splitting the text into input character sequence (X) and output character (y). Then, we will design an Encoder-Decoder approach with Bahdanau Attentionas the Language Model. We will train this model using the train set. Later on, we will apply several sampling methods that we have implemented in Part D to generate text and observe the effect of these sampling methods on the generated text. Thus, in the end, we will have a trained Encoder Decoder-based Language Model for character-level text generation with three sampling methods.
You can access to all parts of the Deep Learning with Tensorflow & Keras Series at my blog muratlkarakaya.net. You can watch all these parts on the Murat Karakaya Akademi YouTube channel in ENGLISH or TURKISH. You can access the complete Python Keras code here.
If you would like to learn more about Deep Learning with practical coding examples, please subscribe to Murat Karakaya Akademi YouTube Channel or follow my blog on muratkarakaya.net. Do not forget to turn on notifications so that you will be notified when new parts are uploaded.
If you are ready, let’s get started!
Last updated on 25th March 2022.

I assume that you have already watched all the previous parts.
Please ensure that you have reviewed the previous parts to utilize this part better.
You can watch this tutorial on YouTube: https://youtu.be/G-yleO61exg
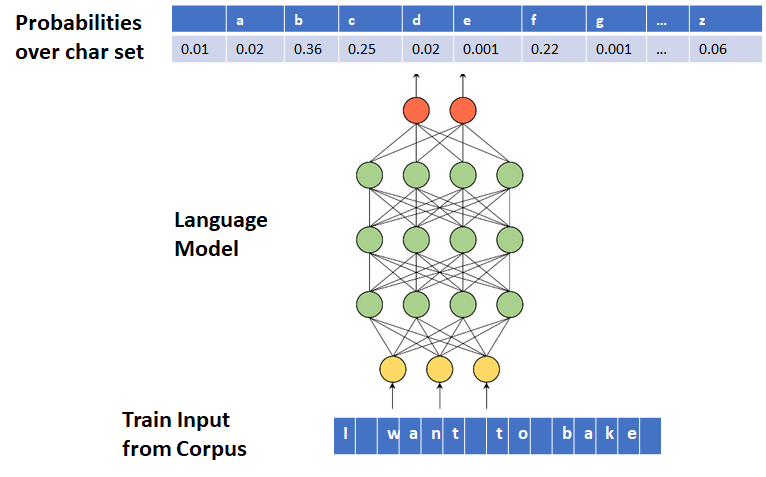
What is a Character Level Text Generation?
A Language Model can be trained to generate text character-by-character. In this case, each of the input and output tokens is a character. Moreover, Language Model outputs a conditional probability distribution over the character set.
For more details, please check Part A.
1. BUILD A TENSORFLOW INPUT PIPELINE
For more information please refer to Part B: Tensorflow Data Pipeline for Character Level Text Generation on Youtube ( ENGLISH / TURKISH) or my blog at muratkarakaya.net.
What is a Data Pipeline?
Data Pipeline is an automated process that involves extracting, transforming, combining, validating, and loading data for further analysis and visualization.
It provides end-to-end velocity by eliminating errors and combatting bottlenecks or latency.
It can process multiple data streams at once.
In short, it is an absolute necessity for today’s data-driven solutions.
If you are not familiar with data pipelines, you can check my tutorials on YouTube in English or Turkish or at my blog muratkarakaya.net .
What will we do in this Text Data pipeline?
We will create a data pipeline to prepare training data for a character-level text generator.
Thus, in the pipeline, we will
- open & load corpus (text file)
- convert the text into a sequence of characters
- remove unwanted characters such as punctuations, HTML tags, white spaces, etc.
- generate input (X) and output (y) pairs as character sequences
- concatenate input (X) and output (y) into train data
- cache, prefetch, and batch the train data for performance
Input for the TensorFlow Pipeline
# For English text
!curl -O https://s3.amazonaws.com/text-datasets/nietzsche.txt% Total    % Received % Xferd  Average Speed   Time    Time     Time  Current
                                 Dload  Upload   Total   Spent    Left  Speed
100  586k  100  586k    0     0   726k      0 --:--:-- --:--:-- --:--:--  725k# For Turkish text
#!curl -O https://raw.githubusercontent.com/kmkarakaya/ML_tutorials/master/data/mesnevi_Tumu.txt
TensorFlow Pipeline
If you are not familiar with data pipelines, you can check my tutorials on YouTube in English or Turkish or at my blog muratkarakaya.net for more implementation details. You can access the complete code (Colab Notebook) using this link.
Result of the Data Pipeline:
for sample in train_ds.take(1):
  print("input (X) dimension: ", sample[0].numpy().shape, "\noutput (y) dimension: ",sample[1].numpy().shape)
  print("input (sequence of chars): ", sample[0][0].numpy(), "\noutput (next char to complete the input): ",sample[1][0].numpy())
  print("input (sequence of chars): ", decode_sequence (sample[0][0].numpy()), "\noutput (next char to complete the input): ",vectorize_layer.get_vocabulary()[sample[1][0].numpy()])input (X) dimension:  (64, 20)
output (y) dimension:  (64,)
input (sequence of chars):  [ 3 13  5 16  5 14  3  9  2  6  9  2  4 11  3  2 13  7 19 17]
output (next char to complete the input):  6
	 edifices as the dogm
input (sequence of chars):  edifices as the dogm
output (next char to complete the input):  aprint("Number of samples (sequences): ",len(train_ds)*batch_size)Number of samples (sequences):  196928
For more information please refer to Part B: Tensorflow Data Pipeline for Character Level Text Generation on Youtube ( ENGLISH / TURKISH) or on muratkarakaya.net.
2. PREPARE SAMPLING METHODS
In Text Generation, sampling means randomly picking the next token according to the generated conditional probability distribution.
That is, after generating the conditional probability distribution over the set of tokens (vocabulary) for the given input sequence, we need to carefully decide how to select the next token (sample) from this distribution.
There are several methods for sampling in text generation (see here and here):
- Greedy Search (Maximization)
- Temperature Sampling
- Top-K Sampling
- Top-P Sampling (Nucleus sampling)
- Beam Search
In this tutorial, we will code Greedy Search, Temperature Sampling, and Top-K Sampling.
For more information about Sampling, please review Part D: Sampling in Text Generation on Youtube ( ENGLISH / TURKISH) or muratkarakaya.net.
def softmax(z):
   return np.exp(z)/sum(np.exp(z))def greedy_search(conditional_probability):
  return (np.argmax(conditional_probability))def temperature_sampling (conditional_probability, temperature=1.0):
  conditional_probability = np.asarray(conditional_probability).astype("float64")
  conditional_probability = np.log(conditional_probability) / temperature
  reweighted_conditional_probability = softmax(conditional_probability)
  probas = np.random.multinomial(1, reweighted_conditional_probability, 1)
  return np.argmax(probas)def top_k_sampling(conditional_probability, k):
  top_k_probabilities, top_k_indices= tf.math.top_k(conditional_probability, k=k, sorted=True)
  top_k_probabilities= np.asarray(top_k_probabilities).astype("float32")
  top_k_probabilities= np.squeeze(top_k_probabilities)
  top_k_indices = np.asarray(top_k_indices).astype("int32")
  top_k_redistributed_probability=softmax(top_k_probabilities)
  top_k_redistributed_probability = np.asarray(top_k_redistributed_probability).astype("float32")
  sampled_token = np.random.choice(np.squeeze(top_k_indices), p=top_k_redistributed_probability)
  return sampled_token
3 AN ENCODER-DECODER LANGUAGE MODEL WITH BAHDANAU ATTENTION FOR TEXT GENERATION
In this tutorial, we will use an Encoder-Decoder Model to create a Language Model for character-level text generation.
You can access the details of the Encoder-Decoder Model and Bahdanau / Luong style Attention from my tutorial series on YouTube (in English or Turkish).
3.1 Define the model
As we already prepared the training dataset, we need to define the input specs accordingly.
Remember that in the train set,
- the length of the input (X) sequence (sequence_length) is 20 tokens (chars)
- the length of the output (y) sequence is 1 token (char)
Design Attention Layer
Since we aim to use an Encoder-Decoder model with Bahdanau (Additive) Attention mechanism, we need to first define this layer as below.
You can also use the Keras AdditiveAttention layer, however, I prefer to use this code.
For the details of the Encoder-Decoder Model and Bahdanau / Luong style Attention, you can access the tutorial series on YouTube (in English or Turkish).
LSTMoutputDimension=64
class BahdanauAttention(tf.keras.layers.Layer):
  def __init__(self, units, verbose=0):
    super(BahdanauAttention, self).__init__()
    self.W1 = tf.keras.layers.Dense(units)
    self.W2 = tf.keras.layers.Dense(units)
    self.V = tf.keras.layers.Dense(1)
    self.verbose= verbose

  def call(self, query, values):
    if self.verbose:
      print('\n******* Bahdanau Attention STARTS******')
      print('query (decoder hidden state): (batch_size, hidden size) ', query.shape)
      print('values (encoder all hidden state): (batch_size, max_len, hidden size) ', values.shape)

    # query hidden state shape == (batch_size, hidden size)
    # query_with_time_axis shape == (batch_size, 1, hidden size)
    # values shape == (batch_size, max_len, hidden size)
    # we are doing this to broadcast addition along the time axis to calculate the score
    query_with_time_axis = tf.expand_dims(query, 1)

    if self.verbose:
      print('query_with_time_axis:(batch_size, 1, hidden size) ', query_with_time_axis.shape)

    # score shape == (batch_size, max_length, 1)
    # we get 1 at the last axis because we are applying score to self.V
    # the shape of the tensor before applying self.V is (batch_size, max_length, units)
    score = self.V(tf.nn.tanh(
        self.W1(query_with_time_axis) + self.W2(values)))
    if self.verbose:
      print('score: (batch_size, max_length, 1) ',score.shape)
    # attention_weights shape == (batch_size, max_length, 1)
    attention_weights = tf.nn.softmax(score, axis=1)
    if self.verbose:
      print('attention_weights: (batch_size, max_length, 1) ',attention_weights.shape)
    # context_vector shape after sum == (batch_size, hidden_size)
    context_vector = attention_weights * values
    if self.verbose:
      print('context_vector before reduce_sum: (batch_size, max_length, hidden_size) ',context_vector.shape)
    context_vector = tf.reduce_sum(context_vector, axis=1)
    if self.verbose:
      print('context_vector after reduce_sum: (batch_size, hidden_size) ',context_vector.shape)
      print('\n******* Bahdanau Attention ENDS******')
    return context_vector, attention_weights
Define the Encoder-Decoder
Now, we can design the model:
- We will first provide the data pipeline parameters we set so far
- Using the Keras Embedding layer, the input tokens will be converted to a higher dimensional representation.
- Using the Keras LSTM layer as the encoder, we will encode the input sequence into a compact representation.
- After initializing the Attention and Decoder layers, the decoder runs in a loop to generate an output for the given input sequence.
For more details, please see the Encoder-Decoder Model and Bahdanau / Luong style Attention tutorial series on YouTube (in English or Turkish).
verbose= 0
#See all debug messages

#batch_size=1
if verbose:
  print('***** Model Hyper Parameters *******')
  print('latentSpaceDimension: ', LSTMoutputDimension)
  print('batch_size: ', batch_size)
  print('sequence length (n_timesteps_in): ', max_features )
  print('n_features: ', embedding_dim)

  print('\n***** TENSOR DIMENSIONS *******')

# The first part is encoder
# A integer input for vocab indices.
encoder_inputs = tf.keras.Input(shape=(sequence_length,), dtype="int64", name='encoder_inputs')
#encoder_inputs = Input(shape=(n_timesteps_in, n_features), name='encoder_inputs')

# Next, we add a layer to map those vocab indices into a space of dimensionality
# 'embedding_dim'.
embedding = layers.Embedding(max_features, embedding_dim)
embedded= embedding(encoder_inputs)

encoder_lstm = layers.LSTM(LSTMoutputDimension,return_sequences=True, return_state=True,  name='encoder_lstm')
encoder_outputs, encoder_state_h, encoder_state_c = encoder_lstm(embedded)

if verbose:
  print ('Encoder output shape: (batch size, sequence length, latentSpaceDimension) {}'.format(encoder_outputs.shape))
  print ('Encoder Hidden state shape: (batch size, latentSpaceDimension) {}'.format(encoder_state_h.shape))
  print ('Encoder Cell state shape: (batch size, latentSpaceDimension) {}'.format(encoder_state_c.shape))
# initial context vector is the states of the encoder
encoder_states = [encoder_state_h, encoder_state_c]
if verbose:
  print(encoder_states)
# Set up the attention layer
attention= BahdanauAttention(LSTMoutputDimension, verbose=verbose)


# Set up the decoder layers
decoder_inputs = layers.Input(shape=(1, (embedding_dim+LSTMoutputDimension)),name='decoder_inputs')
decoder_lstm = layers.LSTM(LSTMoutputDimension,  return_state=True, name='decoder_lstm')
decoder_dense = layers.Dense(max_features, activation='softmax',  name='decoder_dense')

all_outputs = []

# 1 initial decoder's input data
# Prepare initial decoder input data that just contains the start character
# Note that we made it a constant one-hot-encoded in the model
# that is, [1 0 0 0 0 0 0 0 0 0] is the first input for each loop
# one-hot encoded zero(0) is the start symbol
inputs = np.zeros((batch_size, 1, max_features))
inputs[:, 0, 0] = 1
# 2 initial decoder's state
# encoder's last hidden state + last cell state
decoder_outputs = encoder_state_h
states = encoder_states
if verbose:
  print('initial decoder inputs: ', inputs.shape)

# decoder will only process one time step at a time.
for _ in range(1):

    # 3 pay attention
    # create the context vector by applying attention to
    # decoder_outputs (last hidden state) + encoder_outputs (all hidden states)
    context_vector, attention_weights=attention(decoder_outputs, encoder_outputs)
    if verbose:
      print("Attention context_vector: (batch size, units) {}".format(context_vector.shape))
      print("Attention weights : (batch_size, sequence_length, 1) {}".format(attention_weights.shape))
      print('decoder_outputs: (batch_size,  latentSpaceDimension) ', decoder_outputs.shape )

    context_vector = tf.expand_dims(context_vector, 1)
    if verbose:
      print('Reshaped context_vector: ', context_vector.shape )

    # 4. concatenate the input + context vectore to find the next decoder's input
    inputs = tf.concat([context_vector, tf.dtypes.cast(inputs, tf.float32)], axis=-1)

    if verbose:
      print('After concat inputs: (batch_size, 1, n_features + hidden_size): ',inputs.shape )

    # 5. passing the concatenated vector to the LSTM
    # Run the decoder on one timestep with attended input and previous states
    decoder_outputs, state_h, state_c = decoder_lstm(inputs,
                                                     initial_state=states)
    #decoder_outputs = tf.reshape(decoder_outputs, (-1, decoder_outputs.shape[2]))

    outputs = decoder_dense(decoder_outputs)
    # 6. Use the last hidden state for prediction the output
    # save the current prediction
    # we will concatenate all predictions later
    outputs = tf.expand_dims(outputs, 1)
    all_outputs.append(outputs)
    # 7. Reinject the output (prediction) as inputs for the next loop iteration
    # as well as update the states
    inputs = outputs
    states = [state_h, state_c]


# 8. After running Decoder for max time steps
# we had created a predition list for the output sequence
# convert the list to output array by Concatenating all predictions
# such as [batch_size, timesteps, features]
decoder_outputs = layers.Lambda(lambda x: K.concatenate(x, axis=1))(all_outputs)

# 9. Define and compile model
model_encoder_decoder_Bahdanau_Attention = Model(encoder_inputs,
                                                 decoder_outputs, name='model_encoder_decoder')
3.2 Compile the model
Since we use integers to represent the output (Y), that is; we do not use one-hot encoding, we need to use sparse_categorical_crossentropy loss function.
model_encoder_decoder_Bahdanau_Attention.compile(optimizer= tf.keras.optimizers.RMSprop(learning_rate=0.001),
                                                 loss='sparse_categorical_crossentropy', metrics=['accuracy'])
Here is the summary of the model. Pay attention that the output of the model is (64, 1, 96). That is, for each input in the batch (64), we have 1 output represented by 96 logits. 96 is the size of the vocabulary. Thus, the model will predict the next token (y) by providing the conditional probabilities of each token (char) in the vocabulary.
model_encoder_decoder_Bahdanau_Attention.summary()Model: "model_encoder_decoder"
__________________________________________________________________________________________________
Layer (type)                    Output Shape         Param #     Connected to
==================================================================================================
encoder_inputs (InputLayer)     [(None, 20)]         0
__________________________________________________________________________________________________
embedding (Embedding)           (None, 20, 16)       1536        encoder_inputs[0][0]
__________________________________________________________________________________________________
encoder_lstm (LSTM)             [(None, 20, 64), (No 20736       embedding[0][0]
__________________________________________________________________________________________________
bahdanau_attention (BahdanauAtt ((None, 64), (None,  8385        encoder_lstm[0][1]
                                                                 encoder_lstm[0][0]
__________________________________________________________________________________________________
tf.expand_dims (TFOpLambda)     (None, 1, 64)        0           bahdanau_attention[0][0]
__________________________________________________________________________________________________
tf.concat (TFOpLambda)          (64, 1, 160)         0           tf.expand_dims[0][0]
__________________________________________________________________________________________________
decoder_lstm (LSTM)             [(64, 64), (None, 64 57600       tf.concat[0][0]
                                                                 encoder_lstm[0][1]
                                                                 encoder_lstm[0][2]
__________________________________________________________________________________________________
decoder_dense (Dense)           (64, 96)             6240        decoder_lstm[0][0]
__________________________________________________________________________________________________
tf.expand_dims_1 (TFOpLambda)   (64, 1, 96)          0           decoder_dense[0][0]
__________________________________________________________________________________________________
lambda (Lambda)                 (64, 1, 96)          0           tf.expand_dims_1[0][0]
==================================================================================================
Total params: 94,497
Trainable params: 94,497
Non-trainable params: 0
__________________________________________________________________________________________________
3.3 Train the model
We train the Language Model for 3 epochs.
model_encoder_decoder_Bahdanau_Attention.fit(train_ds, epochs=3)Epoch 1/3
3077/3077 [==============================] - 114s 26ms/step - loss: 2.7572 - accuracy: 0.2109
Epoch 2/3
3077/3077 [==============================] - 41s 13ms/step - loss: 2.2220 - accuracy: 0.3369
Epoch 3/3
3077/3077 [==============================] - 41s 13ms/step - loss: 2.0508 - accuracy: 0.3893
3.4 Create the Inference Model
The trained Encoder-Decoder model is designed to handle batches of inputs. However, in inference (text generation), we need to use this model by one sample (input) only. Therefore, below we create an inference model by using the rained layers of the previous model.
# The first part is encoder
# A integer input for vocab indices.
encoder_inputs = tf.keras.Input(shape=(sequence_length,), dtype="int64", name='encoder_inputs')

embedded= embedding(encoder_inputs)
encoder_outputs, encoder_state_h, encoder_state_c = encoder_lstm(embedded)

encoder_states = [encoder_state_h, encoder_state_c]

all_outputs = []

inputs = np.zeros((1, 1, max_features))
inputs[:, 0, 0] = 1

decoder_outputs = encoder_state_h
states = encoder_states

context_vector, attention_weights=attention(decoder_outputs, encoder_outputs)
context_vector = tf.expand_dims(context_vector, 1)
inputs = tf.concat([context_vector, tf.dtypes.cast(inputs, tf.float32)], axis=-1)
decoder_outputs, state_h, state_c = decoder_lstm(inputs, initial_state=states)
outputs = decoder_dense(decoder_outputs)
outputs = tf.expand_dims(outputs, 1)


# 9. Define and compile model
model_encoder_decoder_Bahdanau_Attention_PREDICTION = Model(encoder_inputs,
                                                 outputs, name='model_encoder_decoder')
3.5 An Auxillary Function for Decoding Token Index to Characters
We need to convert the given token index to the corresponding character for each token in the generated text. Therefore, I prepare the decode_sequence () function as below:
def decode_sequence (encoded_sequence):
  deceoded_sequence=[]
  for token in encoded_sequence:
    deceoded_sequence.append(vectorize_layer.get_vocabulary()[token])
  sequence= ''.join(deceoded_sequence)
  print("\t",sequence)
  return sequence
3.6 Another Auxillary Function for Generating Text
To generate text with various sampling methods, I prepare the following function. The generate_text(model, prompt, step) function takes the trained Language Model, the prompt, and the length of the text to be generated as the parameters. Then, it generates text with three different sampling methods.
def generate_text(model, seed_original, step):
    seed= vectorize_text(seed_original)
    print("The prompt is")
    decode_sequence(seed.numpy().squeeze())


    seed= vectorize_text(seed_original).numpy().reshape(1,-1)
    #Text Generated by Greedy Search Sampling
    generated_greedy_search = (seed)
    for i in range(step):
      predictions=model.predict(seed)
      next_index= greedy_search(predictions.squeeze())
      generated_greedy_search = np.append(generated_greedy_search, next_index)
      seed= generated_greedy_search[-sequence_length:].reshape(1,sequence_length)
    print("Text Generated by Greedy Search Sampling:")
    decode_sequence(generated_greedy_search)

    #Text Generated by Temperature Sampling
    print("Text Generated by Temperature Sampling:")
    for temperature in [0.2, 0.5, 1.0, 1.2]:
        print("\ttemperature: ", temperature)
        seed= vectorize_text(seed_original).numpy().reshape(1,-1)
        generated_temperature = (seed)
        for i in range(step):
            predictions=model.predict(seed)
            next_index = temperature_sampling(predictions.squeeze(), temperature)
            generated_temperature = np.append(generated_temperature, next_index)
            seed= generated_temperature[-sequence_length:].reshape(1,sequence_length)
        decode_sequence(generated_temperature)

    #Text Generated by Top-K Sampling
    print("Text Generated by Top-K Sampling:")
    for k in [2, 3, 4, 5]:
        print("\tTop-k: ", k)
        seed= vectorize_text(seed_original).numpy().reshape(1,-1)
        generated_top_k = (seed)
        for i in range(step):
            predictions=model.predict(seed)
            next_index = top_k_sampling(predictions.squeeze(), k)
            generated_top_k = np.append(generated_top_k, next_index)
            seed= generated_top_k[-sequence_length:].reshape(1,sequence_length)
        decode_sequence(generated_top_k)
3.7 Generate the text
We can call the generate_text() function by providing the trained LM, a prompt and the sequence length of the text to be generated as below.
You can run this method multiple times to observe the generated text with different sampling methods.
generate_text(model_encoder_decoder_Bahdanau_Attention_PREDICTION,
              "Who is it really that puts questions to",
              100)The prompt is
	 who is it really tha
Text Generated by Greedy Search Sampling:
	 who is it really that the sand and the sand to the sand and the sand to the sand and the sand to the sand and the sand t
Text Generated by Temperature Sampling:
	temperature:  0.2
	 who is it really that the seent of the sand the sand as the sand the sand and are and the sand and and mand and the sand
	temperature:  0.5
	 who is it really that his all of beling in the cantsing of the mand of man of the seration of the canding of and becate
	temperature:  1.0
	 who is it really that soghe beley andeency into his mander tos swignction bection and dived saunaishitiojulew of arl the
	temperature:  1.2
	 who is it really that andixhatileoqhelyibredesvacabpo radfertiontitygingtormatisveys fark of badil theirevon rawains
Text Generated by Top-K Sampling:
	Top-k:  2
	 who is it really than some and to suct and than soul theil to sacte of to that than seel too that the contions offrower
	Top-k:  3
	 who is it really thass theragisedicarity onectioul thin seelf ones a mand of he cantone and stratest astiosss timdeled
	Top-k:  4
	 who is it really thactindes ithelindt as so altays is treas tomper aration ountelfalical ofpilsted tomaticitysic indica
	Top-k:  5
	 who is it really that hatsed onedicical ourd a tome isnigaciotyincues ifmussinede whremsomic hust of thancled watis
4 OBSERVATIONS
Info about the corpus
- The size of the vocabulary (number of distinct characters): 34
- The number of generated sequences: 196980
- The maximum length of sequences: 20
Note that this corpus actually is not sufficient to generate high-quality texts. However, due to the limitations of the Colab platform (RAM and GPU), I used this corpus for demonstration purposes.
Therefore, please keep in mind these limitations when considering the generated texts.
About the Language Modle
- We implement an Encoder-Decoder model with the Bahdanau attention mechanism. In the encoder and decoder parts, we use single, uni-directional LSTM layers. Thus, we do not expect this simple model to create high-quality texts.
- On the other hand, you can try to improve this model by incrementing the number of LSTM layers in encoder and decoder parts, the output dimension of the embedding and LSTM layers, etc.
Greedy Search
- The method simply selects the token with the highest probability as its next token (word or char).
- However, if we always sample the most likely word, the standard language model training objective causes us to get stuck in loops like above.
Temperature Sampling
- If the temperature is set to very low values or 0, then Temperature Sampling becomes equivalent to the Greedy Search and results in extremely repetitive and predictable text.
- With higher temperatures, the generated text becomes more random, interesting, surprising, even creative; it may sometimes invent completely new words (misspelled words) that sound somewhat plausible.
Top-k Sampling
- In the studies, it is reported that the top-k sampling appears to improve quality by removing the tail and making it less likely to go off-topic.
- However, in our case, there are not many tokens we could sample from reasonably (broad distribution).
- Thus, in the above examples, Top-K generates texts that mostly look random.
- Therefore, the k value should be chosen carefully with respect to the size of the token dictionary.
CONCLUSION:
In this tutorial, we apply the following steps to generate character-level text generation:
- download a corpus
- apply the Tensorflow Data Pipeline
- create an Encoder-Decoder model
- use three sampling methods
In the next parts, we will see
Part G: Transformer Model for Character Level Text Generation
Part H: Recurrent Neural Network (LSTM) Model for Word Level Text Generation
Part I: Encoder-Decoder Model for Word Level Text Generation
Part J: Transformer Model for Word Level Text Generation
Comments or Questions?
Please share your Comments or Questions.
Thank you in advance.
Do not forget to check out the next parts!
Take care!
References
tf.data: Build TensorFlow input pipelines
Text classification from scratch
Working with Keras preprocessing layers
Character-level text generation with LSTM
Toward Controlled Generation of Text
What is the difference between word-based and char-based text generation RNNs?
The survey: Text generation models in deep learning
Generative Adversarial Networks for Text Generation
FGGAN: Feature-Guiding Generative Adversarial Networks for Text Generation
How to sample from language models
How to generate text: using different decoding methods for language generation with Transformers
Hierarchical Neural Story Generation
How to sample from language models
A guide to language model sampling in AllenNLP
Generating text from a language model
How to Implement a Beam Search Decoder for Natural Language Processing
Controllable Neural Text Generation